Climbing toward the Senaru crater rim feels bigger than the numbers on paper. This 2D1N trek from Senaru village to the rim is a focused hike with the kind of pay-off you can actually see: jungle mornings, a high camp under open sky, and strong views toward Bali and the volcanic area around the lake.
What I really like is the balance between structure and adventure: you get clear checkpoints (Post 2 and Post 3), plus breaks with tea and lunch rather than a grind with no rhythm. I also like the human touch—local guides and porters who help make the long day feel manageable, including one guide named Yantoo who impressed hikers with his support and energy.
One thing to consider: you sleep in a tent at altitude, and you’ll be moving on a schedule that starts early and depends on weather. If camping is a deal-breaker for you, this won’t be the easiest fit.
In This Review
- Key points before you go
- Trek Overview: Senaru crater rim in 2 days, 1 night
- Day 0 Pickup and one night in Senaru before you hike
- Day 1 Morning registration and the forest climb
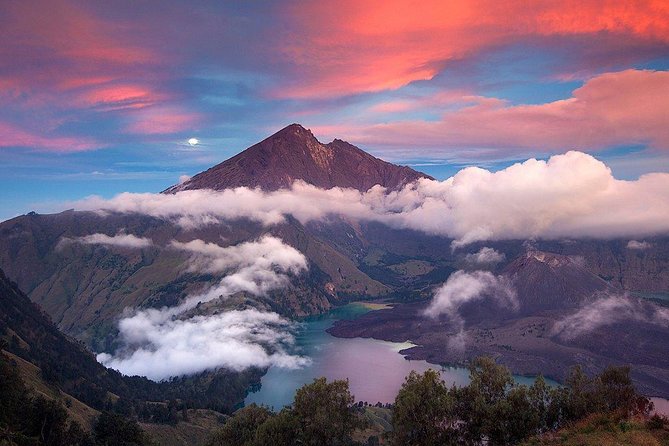
- From Pos 3 to the rim: your big view moment at 2,641 m
- Camp at the rim: sunset, sleep, and altitude reality
- Day 2 Sunrise breakfast and the descent back to Senaru
- Price and value: what $285 includes (and why it’s not just “cheap”)
- What to pack for a tent-night rim camp
- Who this Rinjani Senaru crater rim trek suits best
- Small-group feel and why it matters on volcano days
- Should you book this Senaru crater rim trek?
- FAQ
- What’s the duration of the Rinjani Trekking 2D1N Senaru crater rim?
- Where does the trek start and where do you return to?
- What time does the experience start?
- Is pickup included, and from where?
- What camping gear is included?
- Are meals included?
- Is the Mount Rinjani entrance ticket included?
- What happens if the weather is poor?
Key points before you go
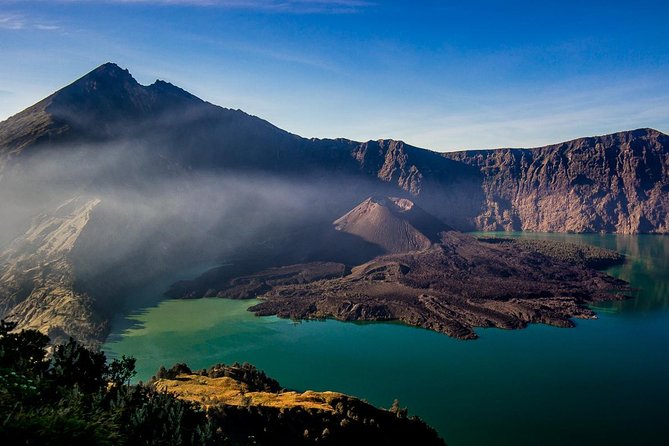
- Jungle-to-rim progression: tropical forest, then the climb to the crater rim at 2,641 m
- Checkpoint breaks: tea and biscuits at Post 2 (Montong SATAS shelter), lunch at Post 3 (Mondokan Lolak)
- Sunset plus sunrise: camp gives you time for a rim view at both ends of the day
- Included tent setup and meals: you don’t have to carry the full camping burden
- Entrance ticket included: Mount Rinjani entry (150,000 IDR per person) is part of the package
Trek Overview: Senaru crater rim in 2 days, 1 night
This is the classic Rinjani “crater rim” style hike—two days on foot, one night camping—starting and ending in Senaru. Day 1 takes you from roughly 601 m above sea level up to the rim camp at 2,641 m. Day 2 is the descent back to Senaru village and onward transport.
The best way to think about it is as a high-reward hike with a pretty practical pace. You’re not doing a multi-day circuit that changes every hour. You’re working toward a view, then returning while your body is still fairly fresh—especially because you get a break rhythm at the official stops.
This also means you’ll want to come mentally ready for two things at the same time: steady walking and “big air” at night. Even if you’re a beginner, the experience is built for manageable segments with support. But altitude is altitude, so you’ll feel the change once you’re above the tree line for real.
You can also read our reviews of more tours and experiences in Gili Trawangan.

Day 0 Pickup and one night in Senaru before you hike
You begin with arrival support. Pickup is offered from the airport of Lombok or other Lombok locations, and you’ll be transferred to your Senaru accommodation for the night. There’s also pickup/return coverage from Mataram, Senggigi, and Bangsal or other locations on Lombok, which is helpful if you’re juggling island transfers.
That pre-trek night matters more than it sounds. Your hike starts early (meeting time is 7:00 am, with trekking beginning around 08:00 after registration). Having time to settle in Senaru the day before can reduce stress and keep you from showing up tired at the start line.
In Senaru, you’ll also find a strong local homestay vibe. Some hikers mentioned the welcome feel at local properties like Bukit Senaru homestay, and the general idea of staying in village-style settings. Even if you don’t choose anything fancy, you’re usually walking into warm, simple hospitality. It’s a good setup for the next morning when you’ll trade slippers for boots.
Day 1 Morning registration and the forest climb
After pickup and your Senaru night, you register at the Rinjani Trek Center Senaru. Then the hike proper begins around 08:00. This first day is about turning the volume down on life and letting the trail guide your attention.
The early portion runs through dense tropical forest, and that’s where the hike feels lively. You’re moving through areas with noticeable flora, plus birds and butterflies along the way. It’s not just scenery. It’s a change in sound and temperature that makes the climb feel less mechanical.
You’ll reach Post 2 at about 1,500 m—the Montong SATAS shelter—where you pause for tea and biscuits. That break is a smart part of the program: it gives your legs a reset and gives you a chance to re-check footing before the steeper sections.
Then it’s up to Pos 3 at about 2,000 m—Mondokan Lolak—for another break and lunch. After lunch, you start the final push to the rim. The program gives you roughly two hours from Post 3 to the crater rim at 2,641 m. Expect the air to feel thinner and the ground to feel more “exposed” as you rise.
From Pos 3 to the rim: your big view moment at 2,641 m
The transition from the forest part to the crater rim part is where the trek shifts from “walking” to “staring up.” The climb to the rim is timed, but it doesn’t feel rushed. The idea is to get you to that specific place where the view becomes the whole point of the hike.
At the rim camp, you’ll have time to settle and enjoy the late-day atmosphere. The rim area is known for strong visibility at sunset, and this program targets that moment. You’re told to look for sunset views over Mount Agung in Bali, plus the smoke activity connected to a volcano around the lake area.
That’s a striking detail because it reminds you this isn’t a postcard hike. You’re on the edge of active geology, and the view isn’t just pretty—it’s alive. If you’re the type who likes to understand what you’re seeing, this is where questions naturally pop up: what’s that plume, where is the smoke coming from, how does the lake sit within the crater system?
Then you camp for the night right at the crater rim. Camping here is part of the thrill. It also means your sleep comfort will depend on weather, temperature, and how you handle altitude at night.
Camp at the rim: sunset, sleep, and altitude reality
One night on the rim is what turns this trek into a memory rather than a long hike. You’ll camp in a tent at the rim after breakfast and sunrise the next morning. The timing is designed so you get both ends of the light cycle—sunset on Day 1 and sunrise on Day 2.
The package includes camping basics: tents, sleeping bags, sleeping mats, a toilet tent, and cooking gear. That matters because it keeps you from worrying about bulky gear on a hike where your legs are already doing the heavy lifting.
Still, be realistic. Even with a sleeping bag, night air at elevation can feel cold. Also, being up at 2,641 m means your body may not feel totally settled. Some people sleep fine. Others wake up a few times. Plan your expectations accordingly.
Comfort tip: treat your evening as “slow.” Hydrate after dinner, eat enough to keep energy steady, and don’t assume you’ll feel like a city couch sleeper. The good part is that the stars and the silence (when the wind calms) can be genuinely incredible.
Day 2 Sunrise breakfast and the descent back to Senaru
Day 2 starts with breakfast and a beautiful sunrise from the camp area. That early light is worth it. It’s also practical—being up early means you’re not rushing your descent in full afternoon heat.
After sunrise breakfast, you descend to Senaru village. The descent is the part that often feels longer than you expect, even when the distance isn’t huge. Your body works differently downhill: knees and ankles get more attention, and you’ll want stable footing.
Once you reach Senaru village, you’re picked up by car and taken to your next destination. That’s one of the benefits of keeping this as a round-trip trek. You don’t have to plan a return day on your own or figure out transport while tired and hungry.
Price and value: what $285 includes (and why it’s not just “cheap”)
At $285 per person, the big question is value. This package is strong on “things you don’t want to manage” yourself.
Your money goes toward:
- Mountain guide and local porters
- All camping equipment (tent, sleeping bag, sleeping mat, toilet tent, cooking gear)
- Meals three times daily during the trek
- One night accommodation in Senaru before the trek starts
- Pickup and return transport from several Lombok locations (airport, Mataram, Senggigi, Bangsal, or other locations)
- Entrance ticket to Mount Rinjani (150,000 IDR per person)
That last item is key. If you’ve ever priced permits for popular volcano areas, you know they add up. Here, the ticket is stated as included, which makes the price easier to compare and less likely to surprise you at the end.
The only clear extra costs are personal expenses and tipping for your guide and porters. Tipping is normal for this kind of trek style, but you should budget for it up front so it doesn’t feel awkward later.
In plain terms: if you want a well-run crater rim hike where you’re not assembling gear lists and permit paperwork yourself, this is priced in a way that covers the real workload.
What to pack for a tent-night rim camp
Because the basic camping gear is included, you can pack lighter than you would for a full DIY trek. But you still need the personal items that make a difference when you’re at altitude.
Bring clothes that work in layers. Daytime hiking can feel manageable, then temperatures can drop at night. Even if your sleeping bag is provided, you’ll feel warmer if you wear appropriate sleep layers and keep dry socks for the night.
Footwear matters. You’ll be walking through tropical forest and then rocky, exposed rim zones. If your shoes slip, you’ll feel it fast—especially on Day 2 descent.
Also plan for basic weather protection. Rain on Rinjani changes the hiking experience quickly. The operator specifically notes the trek requires good weather, and if it’s canceled due to poor conditions, you’re offered another date or a full refund. Still, you’ll want a rain shell and a way to keep your essentials dry.
And yes: bring a small headlamp or flashlight. Rim camps can be dark, and you’ll appreciate seeing where you’re stepping in the tent area.
Who this Rinjani Senaru crater rim trek suits best
This program is described as suitable for beginner hikers, with the caveat that you should have moderate physical fitness. Translation: you don’t need to be a mountain athlete, but you do need stamina and comfort walking for hours at a steady pace.
It’s a great fit if:
- You want a big view payoff without a week-long trek
- You like structured breaks (tea at Post 2, lunch at Post 3)
- You’re excited by sunrise and sunset from a real high camp
- You prefer having guides and porters handle the heavy logistics
It’s not the best fit if you:
- Hate camping or can’t sleep in tents
- Want a very relaxed, slow sightseeing day (this is hiking)
- Are extremely altitude-sensitive without any experience acclimatizing
If you fall into the middle—curious but nervous—this is still worth considering because the trek is paced with official stops and support.
Small-group feel and why it matters on volcano days
This is a private tour/activity, meaning it’s just your group. That can be a real quality upgrade on a trek like this. When pacing is set for one group, it’s easier to adjust to your comfort level without getting lost in a larger moving crowd.
It also means you can focus on the trail instead of constantly checking schedules and trying to keep up with different walking speeds. On Day 2, especially, having a consistent group rhythm helps your legs and mind stay steady.
Even if you’re traveling solo, a private setup often feels less chaotic and more personal. You’ll still get the benefit of a guide and porters—just with fewer people complicating the flow.
Should you book this Senaru crater rim trek?
Book it if you want a clear, beginner-friendly path to the Rinjani crater rim with organized breaks, included meals, and real camping at altitude. The sunset and sunrise targeting makes it more than just a hike; it’s a timed experience around the view.
Skip it if camping is a deal-breaker or if you’re not comfortable with early starts and a moderate fitness challenge. Also, if you know you struggle with altitude or cold nights, you’ll want to think carefully before committing.
If you do book, you’ll get the core ingredients that make these volcano trips work: a guided climb, thoughtful checkpoints, and the kind of rim night where the quiet feels bigger than the world below. Just pack for the cold, move at your own pace, and treat the sunrise as part of the adventure, not a chore.
FAQ
What’s the duration of the Rinjani Trekking 2D1N Senaru crater rim?
It’s listed as approximately 3 days, with a 2 days 1 night trek from Senaru village to the Senaru crater rim and then a return the next day.
Where does the trek start and where do you return to?
You start in Senaru village and trek up to the Senaru crater rim. The next day you descend back to Senaru village.
What time does the experience start?
The meeting point start time is 7:00 am, and trekking typically starts around 08:00 after registration.
Is pickup included, and from where?
Pickup and return transport are included from the Lombok airport and also from places such as Mataram, Senggigi, and Bangsal or other locations in Lombok.
What camping gear is included?
Camping equipment is included: tent, sleeping bag, sleeping mat, toilet tent, and cooking gear.
Are meals included?
Yes. The tour includes all meals (3 times daily) during the trek.
Is the Mount Rinjani entrance ticket included?
Yes. The Mount Rinjani entrance ticket is included at 150.000 IDR per person.
What happens if the weather is poor?
This experience requires good weather. If it’s canceled due to poor weather, you’ll be offered a different date or a full refund.