Silver sparks in your hands in Bali. In a small workshop in Kuta or Uluwatu, you design and craft a ring or bracelet from scratch while a silversmith guides the whole process. I love how you handle the full process yourself, and I love that you leave with a piece you can wear right away as a real souvenir.
The main thing to plan for is the 5-gram limit pricing: if your piece ends up using more than 5 grams, there’s an extra IDR 100,000 per gram, and you can’t really swap or share silver with another participant. Go in ready to commit to one design during the 3-hour session, and keep some cash handy if you start eyeing chunkier styles.
In This Review
- Key points before you book
- Bali Silver Jewelry Making Class: the real appeal
- Kuta vs Uluwatu: picking the right workshop for your Bali plan
- Uluwatu workshop (great if you’re doing sunsets)
- Kuta workshop (ideal for easy beach access)
- Quick practical note
- What you’re making in 3 hours (and what the steps actually teach)
- 1) Design selection: start with a look that fits the time
- 2) Material intro: pure Indonesian silver vs 925 sterling
- 3) Melting and molding: you watch the metal become a base
- 4) Hammering: harden the bar so it won’t fight you later
- 5) Rolling: turning solid into usable wire or sheet
- 6) Shaping: form it to your design
- 7) Soldering: joining separate parts
- 8) Sanding: removing rough edges
- 9) Polishing: the shine you came for
- 10) Ready to wear: take it home
- Price and value: where your $41 goes (and what can add cost)
- The 5-gram rule
- One design per person
- Stones and extras are not included
- Bring cash for the extras
- Hands-on silver craft: what it feels like in the workshop
- Take home a wearable Bali souvenir (not a shelf ornament)
- Who should do this class (and who should skip it)
- Tips to get a better result before you arrive
- Should you book the Bali silver jewelry class in Kuta or Uluwatu?
- FAQ
- How long is the Bali silver jewelry making class?
- What does the price include?
- Where are the workshop locations in Bali?
- Do I need prior experience to join?
- Can I bring my own jewelry design?
- How does the silver weight pricing work?
- Are gemstones included?
- What languages do instructors speak?
Key points before you book

- Two workshop locations let you match the class to your Bali days: Kuta Beach/Legian area or the Uluwatu side near Garuda Wisnu Kencana
- Hands-on steps from melting to polishing mean you’re not just watching
- English, Indonesian, and Malay instruction, plus a small-group setup that makes it easier to get help
- Clear rules on silver weight and design limits help you avoid surprise costs
- You take home a completed piece made with high-quality Indonesian silver, plus snacks and water
- Plenty of design choices, with options to discuss your own ideas if they fit the time window
Bali Silver Jewelry Making Class: the real appeal
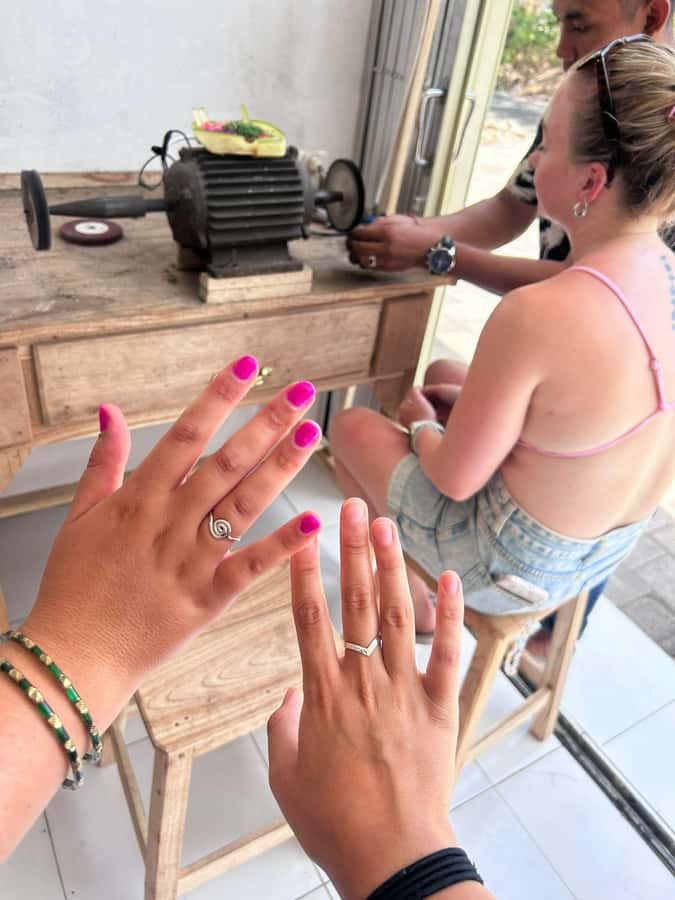
This is the kind of Bali activity that turns your trip memory into something you can actually use. You start with silver and end with a finished ring (or another simple jewelry style) that you helped create step by step. No generic souvenir shop bag. This one comes with your fingerprints on the craft.
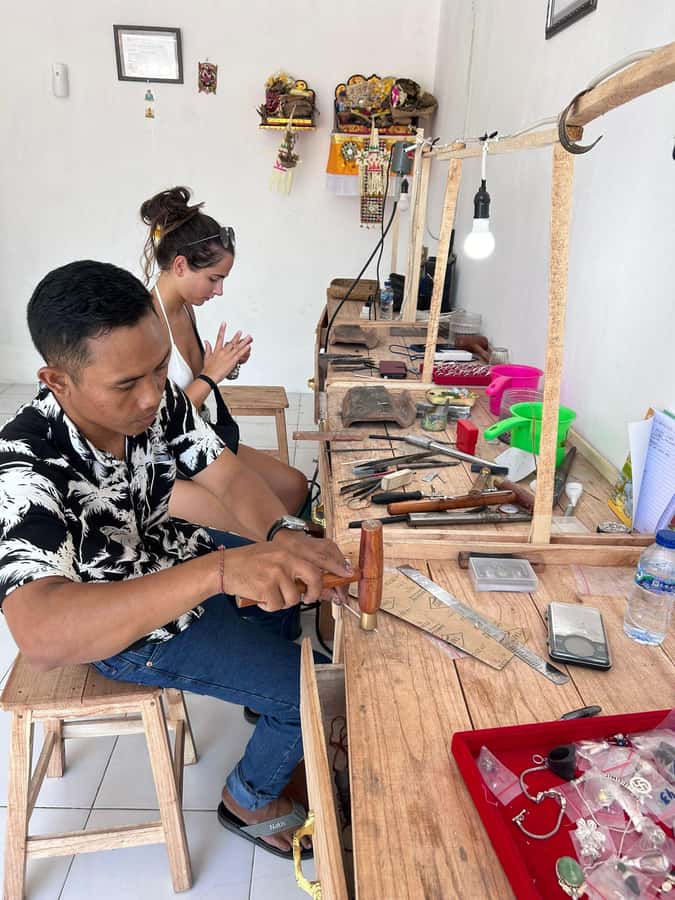
I especially like that the class doesn’t treat beginners like a problem. You’re walked through the process in clear stages, and you get time at the tools. One of the biggest wins is that you learn what each step does: why hammering matters, why rolling changes the look, why sanding affects the final shine, and why polishing is where it all snaps together.
The other big plus is the personal feel. People leave with matching pieces, pieces tied to a specific memory, and designs that look like they belonged to them from day one. Guides such as Made and Kusuma show up in many experiences, and the common thread is patient, practical coaching that keeps the session moving.
You can also read our reviews of more tours and experiences in Uluwatu.


Kuta vs Uluwatu: picking the right workshop for your Bali plan
You’ll choose between two locations, and the choice matters because it can affect how smoothly the class fits into the rest of your day.
Uluwatu workshop (great if you’re doing sunsets)
The Uluwatu workshop is near Garuda Wisnu Kencana (GWK) and the Uluwatu Kecak Dance area. It’s also close to Pandawa Beach and Melasti Beach. If your Bali schedule leans toward the southwest—temples, beaches, sunset plans—this one keeps you from crisscrossing the island.
Kuta workshop (ideal for easy beach access)
The Kuta workshop is near Kuta Beach and the Beachwalk Shopping Center area (also close to Legian Beach). If you’re staying in central Kuta and want a class that’s simple to slot between beach time and dinner, this is usually the smoother option.
Quick practical note
The meeting point can vary depending on which option you book, so double-check your exact pickup or location details. Also, wear comfortable clothing, because you’ll be working with your hands through multiple stages.

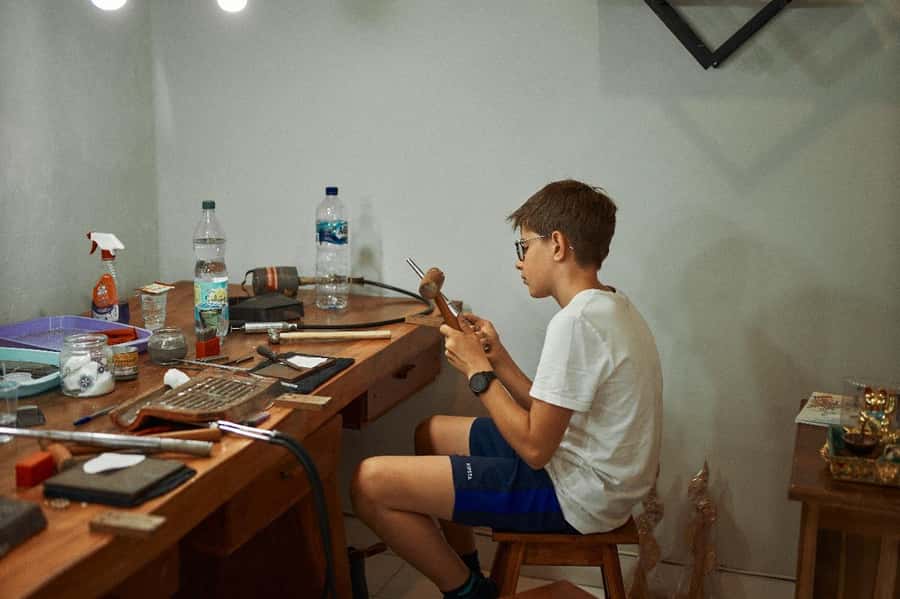
What you’re making in 3 hours (and what the steps actually teach)

The class is built around a structured process—design, shape, join, smooth, polish—so you’re not just producing an item. You’re learning the craft logic behind silversmithing.
Here’s how the flow works, in plain terms:
1) Design selection: start with a look that fits the time
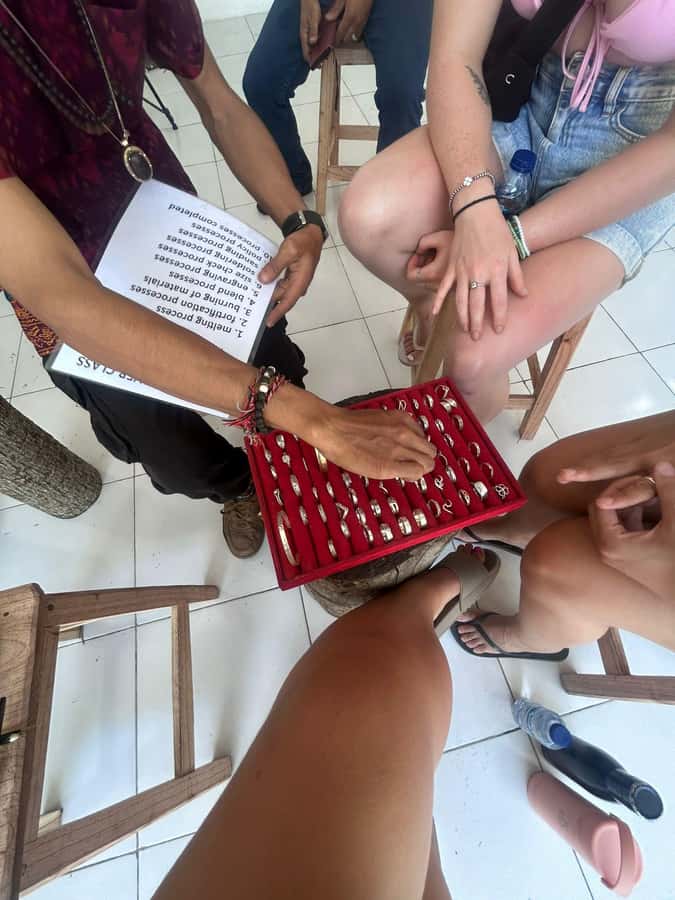
You pick from a set of reference designs at the workshop. If you want to bring your own design, you can—just be ready to discuss feasibility with the silversmiths since the project has to be doable inside the session.
This is important: some ideas look great on paper but take longer than a first-timer workshop allows. The staff help you choose something executable, which is part of why the end results look polished instead of rushed.
2) Material intro: pure Indonesian silver vs 925 sterling
You’ll be introduced to what silver you’re using, including whether it’s pure silver or 925 sterling silver. This matters for understanding the metal you’re working and what to expect from the shaping process.
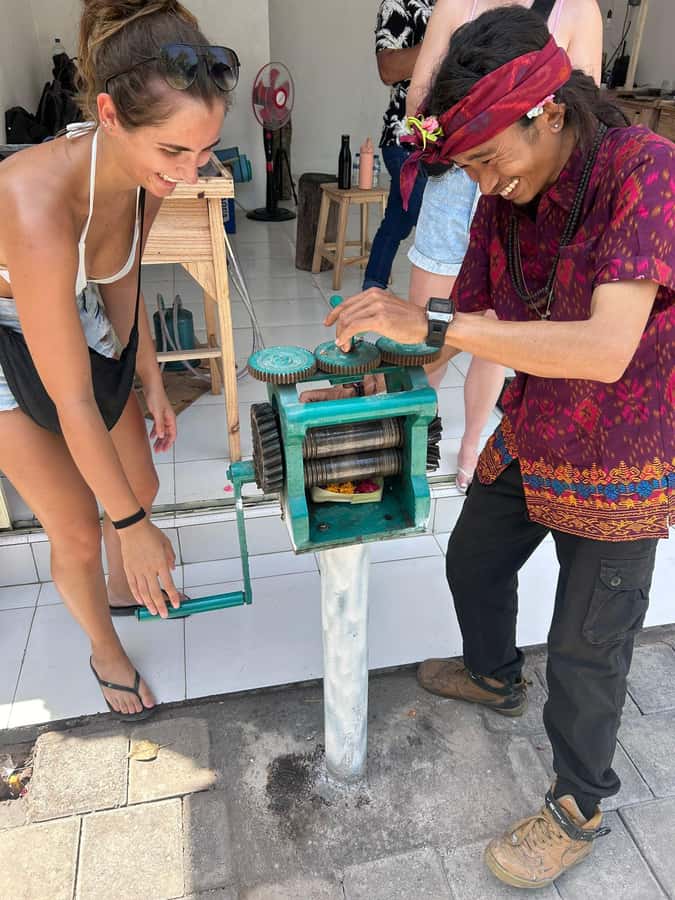
3) Melting and molding: you watch the metal become a base
Melting is the wow moment for many people. A special burner is used to melt the silver, which is then poured into a mold to form a silver bar. From there, you don’t start immediately with decoration—you start with a workable base.
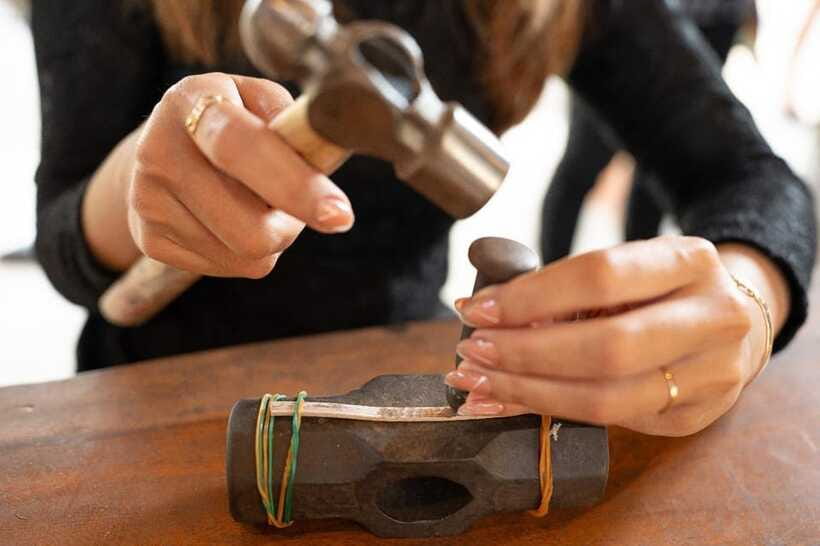
4) Hammering: harden the bar so it won’t fight you later
Hammering helps harden the metal. That toughness makes it less likely to break during later stages like rolling and shaping.
5) Rolling: turning solid into usable wire or sheet
Rolling creates thin sheets or wire, depending on the jewelry type. This is where the item starts to look like jewelry, not just metal bits.
6) Shaping: form it to your design
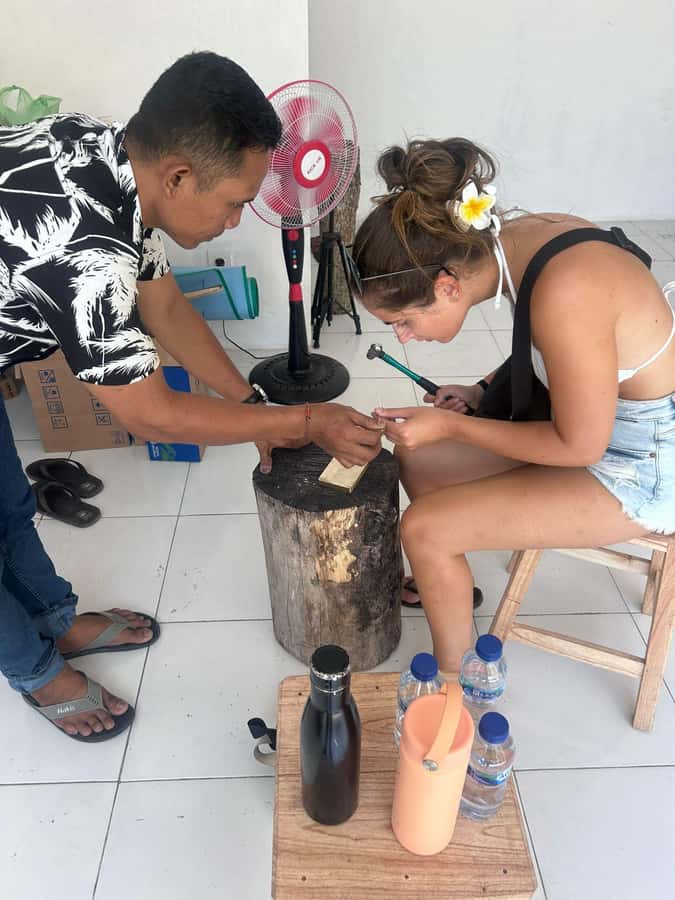
You shape the silver pieces to match what you picked at the beginning. This is hands-on time, and it’s also where your design choices start to matter—simple shapes tend to come out cleaner for first sessions.
7) Soldering: joining separate parts
When parts need to connect, soldering is used to join them. The quality of these joins affects the final comfort and the look once everything is sanded.
8) Sanding: removing rough edges
After soldering, sanding smooths rough spots and cleans up connections. This step is what turns a functional join into something that feels finished.
9) Polishing: the shine you came for
Polishing uses a special tool to give that refined finish. In some sessions, you might also get finishing touches like oxidizing for contrast, depending on the look you choose and what the workshop supports.
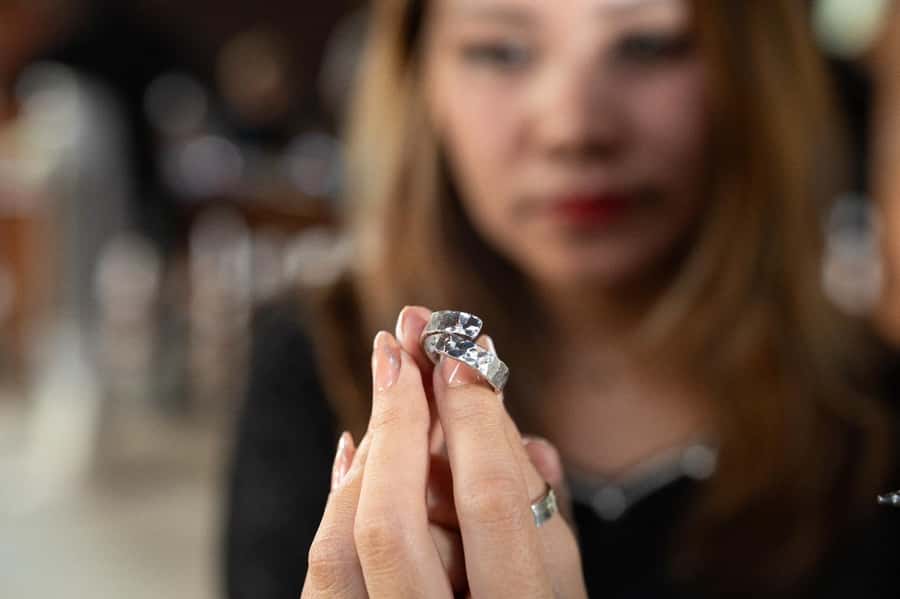
10) Ready to wear: take it home
Once polished, your jewelry is ready to wear and keep. Many people treat this as the most meaningful Bali purchase they made that day, because it’s personal and practical at the same time.
Price and value: where your $41 goes (and what can add cost)
At around $41 per person for a ~3-hour class, the value comes from two things: you’re paying for skilled instruction plus the materials, tools, and the take-home result.
Included in the price:
- Indonesian silver typically 3 to 5 grams
- Personalized guidance from silversmiths
- All necessary materials and tools
- A finished piece to take home
- Snack, mineral water, and free Wi-Fi
Now the “read this twice” parts:
The 5-gram rule
If your finished jewelry uses less than 5 grams, the workshop still counts it as 5 grams. If it uses more than 5 grams, you’ll pay an additional fee of IDR 100,000 per extra gram.
One design per person
Each participant can only make 1 jewelry design. If you make more than one, it’s an extra IDR 300k per additional design.
Stones and extras are not included
Adding gems or stones has an extra charge. Also, silver sharing isn’t part of the included setup, so plan to make your own piece rather than splitting materials.
Bring cash for the extras
The workshop explicitly notes that you should prepare cash for excess silver charges. If you’re the type who likes bold, thick designs, this matters.
Hands-on silver craft: what it feels like in the workshop
A silver jewelry class can sound like a demo. This one is more like a guided build.
You’re using your hands through multiple stages: melting to create a bar, hammering, rolling into usable metal thickness, shaping parts, soldering joins, sanding down edges, and polishing to a wearable shine. Even when the silversmith handles the highest-precision parts, you’re still participating enough to feel like you made it—not just supervised it.
The small-group setup helps a lot. You’re less likely to get stuck waiting behind others for tool time. Some sessions can even be very hands-on if the group is small, which is a nice advantage if you want coaching and quick corrections.
And yes, the staff vibe matters. Many experiences mention patient teaching and friendly, encouraging guidance, including jokes and careful step-by-step instruction. That’s not fluff. In a craft class, confidence changes everything, especially when you’re learning to shape something you can’t easily “undo.”
Take home a wearable Bali souvenir (not a shelf ornament)
This is one of those activities where the final object is the point. You leave with a real piece of jewelry, designed by you, crafted through real metalwork steps, and finished to a polished look.
What I find valuable is that the class doesn’t steer you toward something generic. People pick designs they genuinely like—rings, bracelets, and matching sets for couples. There are also mentions of engraving being possible, depending on what your design and the workshop support allows, so if you want a date, initials, or a short message, ask during the design stage.
Also, the workshop provides a small comfort buffer: snacks, mineral water, and Wi-Fi. That sounds minor until you realize you’ll be focused for the full session and you might want to step into the workshop without hunting for food first.
Who should do this class (and who should skip it)
This is a strong fit if you:
- Want a hands-on Bali activity instead of another walking tour
- Like crafts and want a souvenir you’ll actually wear
- Are traveling with a partner and want something meaningful (matching pieces are popular)
- Want a beginner-friendly experience where the steps are taught clearly
It may not be the best fit if:
- You’re bringing children under 6 years
- You’re over 70 years (the class is listed as not suitable)
If you have mobility limits, note that the workshop is wheelchair accessible. Still, wear comfortable clothing and expect you’ll be working at a workbench for much of the session.
Tips to get a better result before you arrive
These are the practical things that help you leave with something you love, not just something you finished.
- Choose a design that’s simple enough for 3 hours. If you bring a sketch, discuss feasibility early.
- Think about thickness and weight if you want a heavier look. The silver weight rules can affect the final cost.
- Plan your budget with the 5-gram pricing in mind. If you go beyond 5 grams, you’ll pay IDR 100,000 per extra gram.
- Bring cash for possible extra silver charges and anything stone-related.
- Wear comfy clothes you don’t mind getting a little workshop-stuff on.
- Don’t plan to make multiple designs unless you’re ready for the extra IDR 300k per design.
One more smart move: decide in advance whether you want something clean and shiny only, or whether you’d like a more textured/contrasting finish. Some finishing looks can involve extra steps like oxidizing, and it’s easier to get the style you want when you talk it through during design selection.
Should you book the Bali silver jewelry class in Kuta or Uluwatu?
If you want a Bali souvenir with actual craft behind it, I’d book this. For the money, you’re getting real instruction, the full hands-on process from melting to polishing, and a finished piece you can wear. The small-group feel and multi-step structure make it beginner-friendly without turning it into a passive activity.
I’d hesitate only if you’re very price-sensitive or you know you’ll likely want a heavier piece or extra options like stones. The IDR 100,000 per gram over 5 rule is clear, and once you’re thinking big, those costs can climb. Also, if you’re the type who wants unlimited variations, remember: 1 design per person is included, with extra design fees for more.
Overall: this is one of the more meaningful, practical craft experiences in Bali. Pick Kuta for convenience, pick Uluwatu for the southwest sunset/beach vibe, and go in with a design you’re happy to finish within the time.
FAQ
How long is the Bali silver jewelry making class?
The class runs for 3 hours.
What does the price include?
You get Indonesian silver (about 3 to 5 grams, with 5 grams counted for pricing), personalized instruction, all tools and materials, a finished piece to take home, plus snacks, mineral water, and free Wi-Fi.
Where are the workshop locations in Bali?
There are two options: Uluwatu (near Garuda Wisnu Kencana and the Kecak Dance & Sunset Uluwatu area, plus Pandawa and Melasti Beach) and Kuta (near Kuta Beach and Beachwalk Shopping Center).
Do I need prior experience to join?
No. The class is suitable for all skill levels, and no prior experience is required.
Can I bring my own jewelry design?
Yes, you can bring your own design, but you’ll need to discuss feasibility with the silversmiths because the design must fit within the workshop’s time.
How does the silver weight pricing work?
You receive silver in the 3 to 5 gram range, but if your piece is under 5 grams it is still counted as 5 grams. If your total is over 5 grams, there’s an extra IDR 100,000 per gram.
Are gemstones included?
Gemstones or stones require an additional charge.
What languages do instructors speak?
Instructors provide guidance in English, Indonesian, and Malay.